Managing MoveData settings
The Settings tab in MoveData lets you control how the app connects to Salesforce, handles errors, and logs activity. This article walks you through each settings section.
Before you begin#
You need the MoveData Application permission set and Salesforce administrator access to change settings. See Navigating the app for details on opening MoveData.
Accessing settings#
- Open the MoveData app in Salesforce.
- Click the Settings tab.
- Select a sub-tab to view its options.
The Settings tab has two main sub-tabs: General and Extensions. Extension-specific tabs appear after you install an extension.
General settings#
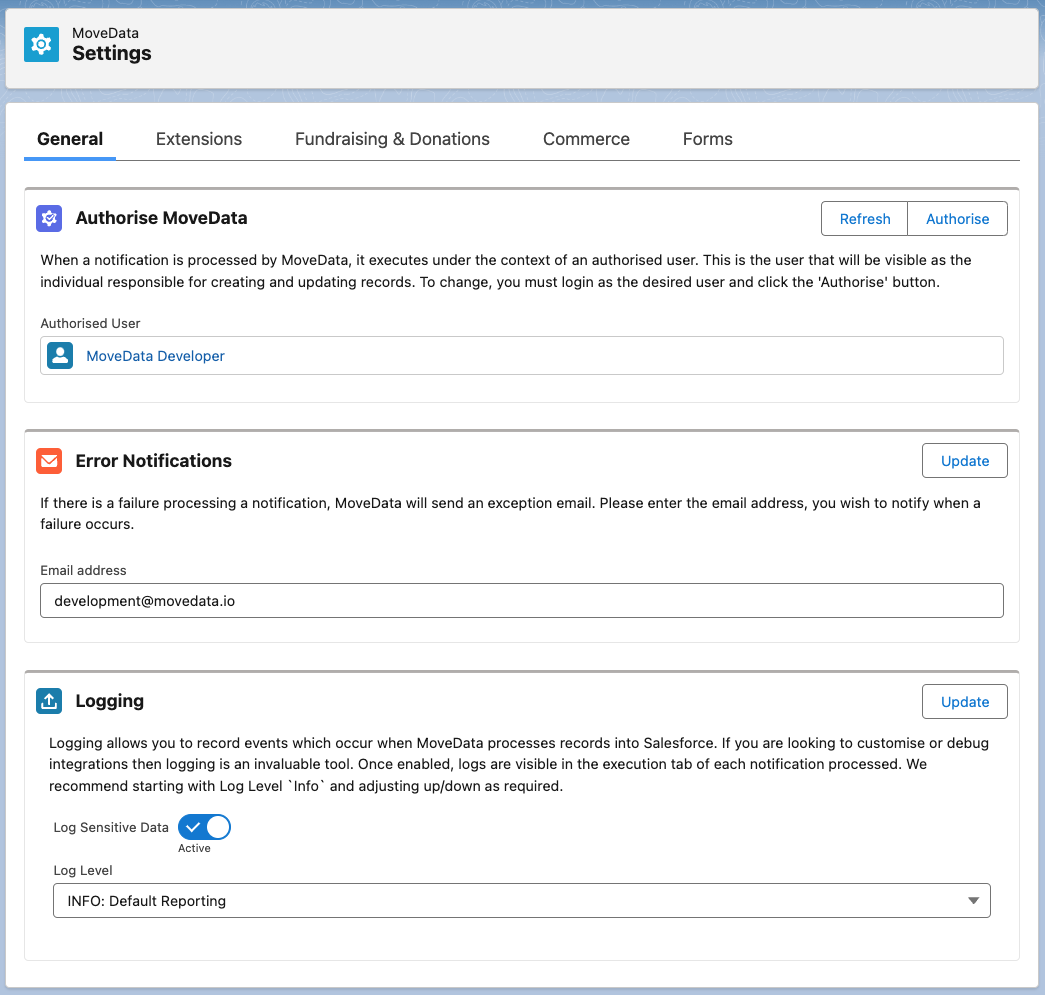
The General sub-tab contains three sections: Authorise MoveData, Error Notifications, and Logging.
Authorise MoveData#
MoveData connects to Salesforce through an authorised user account. This user performs all record operations — creating, updating, and matching records in your org.
The Authorise MoveData section displays the currently authorised user and provides controls to manage authorisation.
| Control | Purpose |
|---|---|
| Authorised User | Displays the Salesforce user MoveData currently runs as. |
| Refresh | Renews the authorisation token without changing the authorised user. |
| Authorise | Opens the Salesforce OAuth flow to change the authorised user. |
To re-authorise MoveData:
- Log in with the Salesforce user account you want MoveData to use.
- Click Authorise in the Authorise MoveData section.
- Grant access when prompted.
Success
Choose a dedicated service account rather than a personal user account. This avoids disruption if a team member leaves your organisation.
For full guidance on the authorised user, see The MoveData Authorised User. To change to a different user, see Change the Authorised User.
Error notifications#
You can receive email alerts when a notification fails during processing.
To enable error notifications:
- Enter an email address in the Error Notifications field.
- Click Update.
MoveData sends an email to that address whenever a notification receives a Failed status. This helps you respond to issues quickly without checking the app manually.
Note
You can enter only one email address. To notify multiple people, use a distribution list or shared mailbox address.
Warning
The error notification email address should be regularly monitored. Ensure no spam filters, email rules, or inbox policies are preventing MoveData error emails from being received.
Logging#
The Logging section controls how much detail MoveData records in execution logs. It has two controls.
Log Level sets the verbosity of log entries:
| Level | What it records | When to use |
|---|---|---|
| ERROR | Errors only. | Stable production integrations where you only need to know about failures. |
| WARN | Errors and warnings. | Production monitoring with slightly more visibility. |
| INFO | General processing information. | Day-to-day use. This is the default and recommended level. |
| DEBUG | Maximum detail, including internal processing steps. | Active troubleshooting of a specific issue. |
Log Sensitive Data — when active, MoveData includes actual field values in log entries rather than just field names. This is useful when troubleshooting data mapping issues.
Keep DEBUG and Log Sensitive Data short-lived
DEBUG logging and Log Sensitive Data generate large volumes of log data and may include personally identifiable information. Enable them only for short troubleshooting sessions, then switch back to INFO with Log Sensitive Data inactive.
For guidance on reading logs, see Viewing execution logs.
Extensions#
The Extensions sub-tab shows your installed extensions and lets you add new ones. Extensions are managed packages that provide business logic for specific Salesforce data models.
| Extension | Description | Supported data model |
|---|---|---|
| NPSP Fundraising & Donations | Maps donation and fundraising information to the NPSP data model. | NPSP |
| NPSP Commerce | Maps ticket and merchandise sales to the NPSP data model. | NPSP |
| Nonprofit Cloud | Maps all supported information to the Nonprofit Cloud data model. | Nonprofit Cloud |
Viewing and installing extensions#
- Click the Extensions sub-tab.
- Review the list of available and installed extensions.
- Click Install next to any extension you want to add.
After installation, an extension-specific tab appears in Settings. Use that tab to configure extension-specific options.
Note
For detailed guidance on each extension, see: